
Welcome to a lengthy post in which I outline a saga of struggle and success. I was seriously intimidated to attempt this, because if I screwed up enough, the only solution would be to replace my KitchenAid Artisan Stand Mixer. And, it’s not exactly cheap. Spoiler alert: I did screw up, but thankfully not enough that a little troubleshooting couldn’t fix it. Credit for my ultimate success goes to my father, who taught me how to look at things methodically; to go slow and figure out how things work or why things aren’t working.

So, let’s get into the grease. Because there was a lot of it, both literal and figurative.
ONE: Wait until the little humans are out of the house.
This has been on the agenda for a while since I broke the KitchenAid back in July. Knowing my penchant for being hyper-focused and a perfectionist when doing things like this, I knew any tiny distraction would send me over the edge. The second day of school was my first, best opportunity
TWO: Maybe don’t break it in the first place.
This all could have been avoided had I known the basics of making dough. I jumped on the pandemic bread-baking craze late in the game because I could never get my hands on any yeast. I was just trying to make a simple pizza dough to recreate the great time I had for my birthday in Kelsey Barnard Clark’s Zoom pizza making class. (Check out her list of classes here, they are so much fun.) The irony is that I made two doughs that day. The first one came out of the mixer just fine. The second went to hell because I didn’t know to add water to help the dough come together. So I just let the mixer run and run for 10 minutes or more waiting and hoping for the dough to form a ball. It didn’t, and the mixer gave up before I did.
Read more: Kneading bread dough in a KitchenAid Stand Mixer
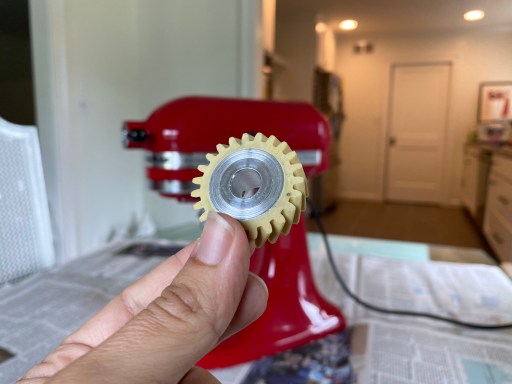
THREE: Order a Worm Gear
Googling told me that if the KitchenAid stops spinning, the most common point of failure is the worm gear. I ordered this one because it was an OEM part and if I was going to all this trouble I didn’t want to take the risk of an after market knock-off. So I rolled my eyes and paid more in shipping than the actual cost of the part. But, the satisfaction of fixing this myself was well worth the $30 versus the alternatives.
FOUR: Watch Mark’s Video
If you are here reading this because you actually have to fix your KitchenAid and not for pure entertainment value, you must watch this video. Good old Mark, circa 2009, will do a much better job walking you through the steps. I’m just here for moral support and to caution you that things are not as simple as a professional fixer makes them seem. But, you can still do this!
FIVE: Do you have a Punch Tool? No, really, this is important.
Seriously, reading this far will all be worth it if I convince the next DIY-er to buy a punch tool. Knowing what I know now, I wish I had purchased this 9-piece Roll Pin Punch Set. But, I was lazy and convinced that I had enough ingenuity to figure it out without one. (I have one now just in case I find myself in this situation again.)
SIX: Start taking the mixer apart.
Okay, so this is really steps 1-3 of the actual repair:
- Remove the screw at the back of the mixer to remove the cap that covers the power grid.
- Place a flathead screwdriver at the top of the drip ring and lightly tap with a hammer or mallet to remove. Note: it’s called a drip ring because it prevents any grease or oil from dripping into the mixing bowl. Once it’s removed, grease and oil is free to leak, so best to do this work over a drop-cloth or newspaper.
- USE A PUNCH TOOL to remove the roll pin that connects the spinning mechanism to the motor.

Power cap is removed 
Drip ring is removed 
Roll pin is FINALLY removed
Mark will call this the “planetary” in the video, and note it happens at about minute 1:40 of the video. In theory, within two minutes you should be through this step.
IT TOOK ME 90 MINUTES.
I won’t give you the play-by-play of the struggle even though it’s a classic comedy of errors. The highlight was when the roll pin was about halfway out and the screwdriver bit I was using instead of a punch tool got stuck halfway in. At that point it was time for lunch and a timely sanity break. But that also meant that kids would be home when I was going to finish this. And I was going to finish this. (Commit to step ONE or else a two-year old will start stealing your tools.)

SEVEN: Remove the motor cover and behold a lot of greasy grease.
Once the roll pin is out, you remove the planetary and nine other screws. And, pull the cord away from the machine. Easy enough. At this point, Mark tells you to “simply lift the motor off of the stand.” Ha. This is what “simple” looked like for us. “Us” because I had to call in reinforcements.
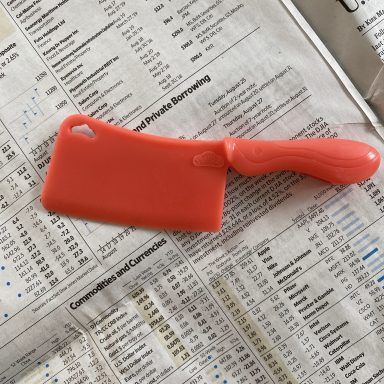
EIGHT: Use a Play-Doh toy cleaver to remove grease from the gear tower.
Mark suggests a putty knife. I didn’t have one of those either. This worked well enough.
NINE: Unscrew the gear tower and remove the OTHER roll pin.
At this point I was indignant. Not only was there another roll pin, and remember, NO PUNCH TOOL, this one was tiny and within a rod that spins. But I was determined, some might say militant, so I started banging away on a skinny little Allen wrench. Until I remembered that I was working on a glass table. I had visions of a misfire and the entire surface shattering in my lap.
I smartly went to the back steps and found a place where the gear settled in a divet in the mortar to keep the roll pin in one place. Thankfully, this attempt didn’t take 90 minutes, but it did take some more trial and error to figure out the right surrogate tools.
TEN: Replace the worm gear.
Lo and behold, the internet was right. The failed worm gear’s teeth were all chewed up. But now began the other fun part: putting roll pins back in.

ELEVEN: Put everything back the way you found it.
Honestly, this whole thing wasn’t as hard as originally thought, minus the hateful roll pins. There is a solution for those, right? This 9-piece Roll Pin Punch Tool Set. Once the worm gear was back in the tower it was a matter of returning all of the screws to their rightful place.
- Three on the gear tower
- Four to attach the motor to the stand
- Five on the motor head
And then came the first roll pin to put back in. Somehow we made it through, but it was not without several more minutes of struggle. Finally, the cap was back on the motor, the drip ring replaced and it was time to plug the mixer in to celebrate victory.
Not. So. Fast.
Now for the troubleshooting portion of this post: Somehow, okay, *I* had tightened a screw below the wiring that I thought was strange to just be halfway in. Turns out that screw is somehow responsible for the speed settings. The mixer would turn on, but not until the eighth speed setting.
So, I figured that out and just loosened that screw back to the way I found it. Turned it on and it worked just fine! Kinda.
But now there was a grinding noise and a burning smell. Sigh. BUT, just like my daddy taught me, I studied and listened and thought back through my steps. I had followed instructions to the letter. (Well, except for that rouge screw.) I had a little trouble getting the spinning mechanism attached back to the motor, so rather than having to do the whole thing over, I was confident I would find something out of whack there.
But that meant I had to remove the roll pin again.
This is getting way too long. The roll pin came out again and I found a motor head screw that wasn’t tight enough. The planetary was grinding against it and some of the enamel had fused to it, hence the burning smell. Tightened the screw, replaced the planetary and roll pin again AND THEN…..
Whew. It was an ordeal. But totally worth it. Not only was I so proud and satisfied with myself, my husband was impressed beyond belief. Now we can get back to all of the cookie and cupcake baking, and maybe attempt some more bread making. Thanks for sticking with me.
TL;DR I fixed my KitchenAid stand mixer and you can too. Just:
- Order an OEM worm gear
- BUY A PUNCH TOOL (Recommend this 9-piece Roll Pin Punch Tool Set)
- Watch this video
- Pat yourself on the back, and make yourself a cocktail.
Cheers!
*This post contains Amazon affiliate links